The versatility of WordPress is what made it the primary choice of most web developers to make websites. However, for some who are not accustomed to using content management systems, it’s easy to get lost, or worse, mess something up in the backend–specifically clients. Fret not for WordPress has built-in role management that gives you the ability to control what various users can do on your website.
How to Manage Client Controls with Gutenberg
Current Roles in WordPress
As mentioned, WordPress has default roles that website owners can assign to users, namely: Super Admin, Administrator, Editor, Author, Contributor, and Subscriber. Each of these roles have unique sets of permissions that allow them to perform certain tasks called capabilities.
There are various types of capabilities such as adding new users to a WordPress website, publishing and editing pages and/or posts, or at the very least, managing a profile.
A summary of the tasks assigned for each role from WordPress is as follows:
- Super Admin – somebody with access to the site network administration features and all other features.
- Administrator – somebody who has access to all the administration features within a single site.
- Editor – somebody who can publish and manage posts including the posts of other users.
- Author – somebody who can publish and manage their own posts.
- Contributor – somebody who can write and manage their own posts but cannot publish them.
- Subscriber – somebody who can only manage their profile.
To add new users, click Add New on the tooltip window when you hover over Users on the panel on the left of your WordPress dashboard. Type in the information in the fields for your new user. Select the role you want to assign in the Role drop down menu and click Add New User to save your changes.

All the users and their assigned roles can be seen in the All Users page. Access this page by clicking All Users when you hover over Users on the panel on the right. If you’re an Administrator, you can always go back and change a User’s role. Just click on Edit underneath their username then change the role in the Role drop down menu, and you’re all set!
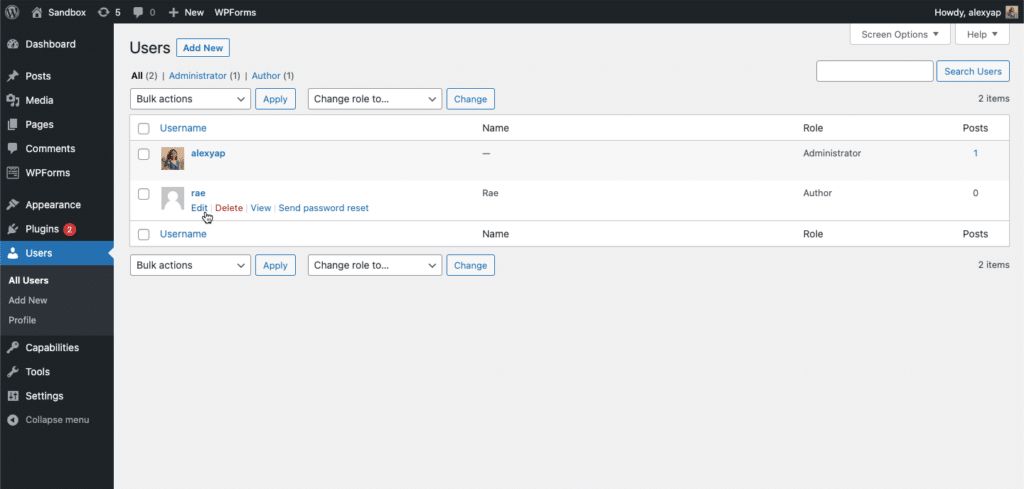
These are just some basic roles that you can assign to users of your website. If you want a client or user to have the ability to create, edit and publish new posts, you can assign the role of Author or Editor if you want them to have the ability to edit posts made by others as well.
However, you can take it a step further and use some plugins that will let website owners or developers edit the capabilities of users, and even add custom users.
Third-party plugins for added functionality
Because these users already have pre-set capabilities, it’s possible for some website owners or developers to want to have the ability to customize the permissions that these user roles have.
For example, the Editor is the perfect role for a contracted content writer or copywriter so that they can edit posts of a website, no matter how old or new. However, since Editors can delete posts, it’s possible for them to delete posts that you have. Now, imagine the disaster if you were not able to perform a recent backup of your website. You won’t be able to retrieve any changes that were made!
Thankfully, some geniuses noticed this gap and developed plugins that permit website owners/developers to customize and even add user roles. PublishPress Capabilities: Manage WordPress Permissions and Edit User Roles is a plugin with an easy interface that makes this possible. It’s a free plugin with premium plans that give you additional functionality.
You can download the plugin from the WordPress plugin repository or search for its name in the Plugins page. Simply hover over Plugins on the left menu panel, and click Add new. Search for the plugin name in the search bar on the top right, then install and activate the plugin from the search results.

Adding Roles
Once it’s activated, you can add user roles by hovering over Capabilities on the left menu panel and clicking Roles.

Type the name you want to assign to the new role and click the Add button. This will add the new role to the list of user roles in your WordPress website. You can now edit the capabilities assigned to this role by hovering over the newly added role and clicking Capabilities.
You can easily adjust the permissions this new role has by ticking the checkboxes beside each capability for certain types of content.

Once you’re done, click Save Capabilities and this new user role is all set to be assigned!
Editing default user roles
You can also edit the built-in user roles within WordPress. From your WordPress dashboard, hover over Capabilities on the left menu panel, and click Capabilities. On the drop down menu on the top of the interface, select the role that you want to edit.

And you can now adjust the capabilities assigned for the selected role. Don’t forget to click the Save Capabilities button to save your changes!
Stackable Role Manager
Editing permissions and capabilities for roles are usually limited to the tasks such as creating, editing, deleting, and publishing whole posts or pages. We recognize that there is a need to be able to edit posts and pages without disturbing the way they were built, especially for page builder Gutenberg blocks.
Noticing this gap, we’ve developed the Role Manager for Stackable users, which will give website owners and/or developers the ability to either allow full editing access to blocks (meaning they are also able to add or delete blocks and edit how they were designed) or content-only acess (a mode wherein a user will only be allowed to edit the content such as text and media assets).
If your website is built on Stackable, you can toggle these settings by going to the Settings tab of your Stackable admin page.
When you enable the Content Only Editing mode, here is how it would look like:
Not only will these settings be applied to Stackable blocks, but for native Gutenberg blocks and other Gutenberg-based blocks as well! Sounds like a great deal, don’t you think?
Over to you
Having more control over the permissions and capabilities of the users of your WordPress website may seem like a task we can overlook. However, you’ll thank yourself later on for doing it.
If you liked this article, check out our other blogs where we have various WordPress guides, web design tips, and more. We’ve also recently launched Stackable Learn, your learning hub for all things WordPress and Stackable.