Last Updated on May 28, 2024
Avoid the risk of breaking your live website; follow this quick tutorial to set up a staging site for your WordPress article!
Making significant changes to your live website leaves it vulnerable to breakage. The last thing you want is having a broken website because this can cost you lost customers or conversions. You can eliminate this risk by using a staging site.
What is a staging site?
A staging site is basically a clone of your live website where you can implement and/or test significant changes you plan to make.
Because it’s a replica of your live website, any changes you make to it will not be reflected in the latter. This gives you the ability to test compatibility of different plugins, theme changes, CSS or HTML revisions, plugin or WordPress updates, and more.
Why should I use a staging environment for my WordPress website?
Well, for starters, the major benefit to using a staging site is that you can implement any change on it without the risk of breaking the live environment of your website. In the case that you do run into an issue in the staging environment, you can easily pull all the content from your live website back to your staging site again. No harm done on your WordPress website.
Second, it usually comes at no additional cost and doesn’t take up much of your time and effort to set up. Another benefit would be that it reduces risks from malware and hacking. If you suddenly find that your website has become a target of hacking, you can just push the content from your staging site to your live website.
Like all things, using a staging site also has some drawbacks. The first being that not everything from your live website can be replicated into your staging site. An example would be that there is no caching on a staging site by default and you will have to configure some settings to enable this. Another disadvantage is that deploying changes to a live website may take some time–meaning, you will have to wait a bit before you can see changes on your live WordPress website.
Lastly, it’s important to note that you will have to be fast when you’re working on your staging site since your live site will be completely overwritten by the staging site when you push it to live. For instance, a few people shared an article and you have a share counter, when you push to live the counter will rollback to whatever the staging site had before.
Setting up a staging site
If you’re convinced that using a staging site will do you more good than harm, then keep reading to learn the two ways you could set it up for your WordPress website!
Creating a staging site through your web host
Most hosting plans from popular hosting providers already come with built-in staging capabilities, such as Bluehost, Kinsta, and Nexcess.
These hosting services usually provide a one-click set up for your staging site, so if your website is hosted with these providers, the process of creating a staging site will be very simple.
Here are tutorials on how to create a staging site with some popular web hosting services:
Creating a staging site through a plugin
If a built-in staging site creation is not available for your current host, don’t worry! There is an alternative.
Here are three of the most popular staging plugins for WordPress:
- WP Staging – WP Staging is a solution that offers one-click setup, cloning, and deployment. The staging site will be hosted on your own server, however, they claim high performance, meaning that pulling up data from your live site to your staging site will not slow your website down. WP Staging now includes full-site backing up and server migration.
WP Staging offers a free version which you can download from the WordPress plugin directory, however it’s limited to one feature: cloning your website to your live site. For premium plans, as of writing, they offer a personal license at $103 which is perfect for those who are DIY-ing their website. - WP Stagecoach – WP Stagecoach also offers one-click setup and deployment which will be hosted on their own server so it won’t take up space in your own host. Additionally, all staging sites created using WP Stagecoach will include SSL support to keep your staging site extra secure.
WP Stagecoach doesn’t offer a free license, but you can try their plugin for free for 5 days. The most basic license they offer is currently priced at $99 a year. - BlogVault – BlogVault is not exactly a staging plugin–it’s a plugin that provides back up solutions for WordPress websites but they include a free staging site for their packages.
You can also set up and deploy your staging site with one click. It’s compatible with any host so you don’t have to go through the hassle of switching hosts.
For this article, we’ll be teaching you how to set up a staging site using the most accessible plugin, WP Staging.
1. Install and activate WP STAGING – Backup Duplicator & Migration.

2. Once you’ve finished activating the plugin, you should be redirected to the plugin’s interface. Click Skip & Start Cloning for now.

3. Go to the Staging Sites section of the WP Staging plugin. You should see a CREATE NEW STAGING SITE button, click this button to start the setup process of your staging site.

4. Enter a name for your staging site in the input text field. For example, I used something as simple as “sandbox-staging”. Click Start Cloning once you’ve typed in the name of your staging site.

5. This should prompt the plugin to start setting up your staging site. It may take a few minutes to finish.

6. You should be met with a congratulatory note that the staging site has been set up! There should be a permalink linking you to your staging site. Click this to access it.

7. You will then be prompted to enter login credentials. For this, use the login credentials that you use to access the backend of your live website.

8. And there you have it! You have your own staging site where you can customize and conduct all the tests before executing them on your live website.

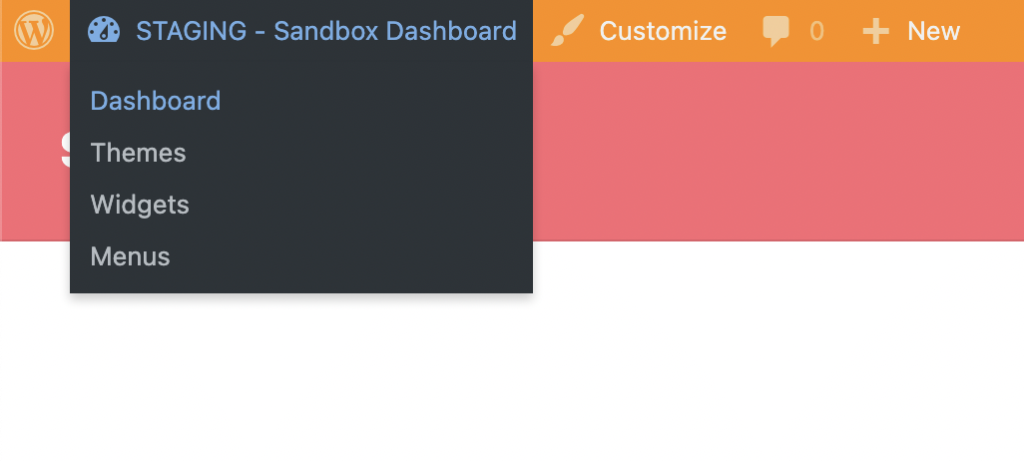
To access the backend, simply hover over your site’s name and click Dashboard or you can just append /wp-admin to your staging site’s URL (e.g. https://sandbox.com/sandbox-staging/wp-admin)
Pushing the staging site to live
When you decide it’s time to push your staging site to live, you will be prompted to choose between three deployment options.
- Import all changes – this will overwrite all the data in your live site with the changes you made in your live site. Be very careful when you choose this as it might cause some new data in your live site to get lost while you were editing your staging site.
- Import database changes only – this will only overwrite changes you made in your database. This is everything that you find in your WordPress admin, such as your posts, post comments, plugins, and theme settings). You will usually do this when you make changes to your theme, website layout, or you created a new page that doesn’t contain any media.
- Import file changes only – this will only overwrite changes you made in your HTML, CSS, or PHP. Select this if you made any changes to your HTML, CSS or PHP that doesn’t require data from your database.
This is called selective deployment/selective push. In other cases, you will even have the ability to select which files or databases you want to deploy changes to.
Hosts and plugins have made it very easy to deploy their staging site changes to the live/production site with their 1-click migration features.
Here’s a look at Kinsta’s 1-click deployment process with their selective push feature, so you can choose whether you will only be pushing file changes, database changes, or both!

Other hosting providers and plugins that also offer 1-click deployment include:
- Bluehost
- Nexcess
- WP Staging
- WP Stagecoach
- BlogVault
Just make sure to check your chosen staging site provider’s documentation and knowledgebase articles for guidance on how to deploy your staging site to your live website.
A Rundown
Staging sites are a great way to make sure your website will continue running even while you make changes to it, whether you run an eCommerce website, a blog, a catalogue website, or a non-profit website. Make the most out of your new staging site by testing updates, plugin compatibility, theme changes, and more!
You can us Wpvivid. This plugin is good for staging site 🙂
Thanks for sharing your suggestion!